Wednesday, August 8, 2012

Safe and Sound

I had to take my knives to be sharpened.  I don't have children, but I think it might have felt like leaving your kid with a babysitter for the first time.  They've come back in awesome shape, though, so we (the knives and I) celebrated by making a Late Summer Garden Risotto.

It started out as an eggplant and tomato risotto, from The Complete Italian Vegetarian Cookbook by Jack Bishop.  And then my husband walked in with our CSA share, and there was a lot more produce staring at me.  I'm pretty happy with the way it turned out: creamy and toothy from the rice, a pop of sweetness from the corn, the acidity of the tomatoes, and earthiness from the zucchini and eggplant.

The knives and I think it's a keeper, and my husband agrees.

Late Summer Garden Risotto

serves 6-8

1 ear of corn, kernels cut off, cob broken in half and reserved
5-6 cups of water
1/2 tsp salt
olive oil
1 clove garlic, minced
1/2 red onion, finely chopped
1 cup of rice, Arborio or Carnaroli
1 small eggplant, or 6 Fairy Tale eggplant, chopped
2 small zucchini, chopped
1/4 cup white wine (optional)
2 small to medium tomatoes, seeded over a strainer, liquid pressed into the water above, chopped
salt and pepper to taste
Parmigiano Reggiano cheese, to taste
5 large basil leaves, sliced thinly
5 large mint leaves, sliced thinly

1.  Put the corn cob, 1/2 tsp of salt, tomato juice and water in a small saucepan.  Bring to a boil, reduce heat to simmer.

2.  Heat olive oil in a large skillet over medium.  Add garlic and onion, and cook gently until softened, about 4 minutes.  Add rice; stir to coat with oil.  Add eggplant and zucchini, stir to coat with oil.  Cook about 5 minutes.  Add wine if using; cook, stirring, until mostly absorbed.

3.  Add 1 cup of the corn cob liquid to the rice mixture.  Cook, stirring occasionally, until the liquid is absorbed.  Keep adding liquid by the 1/2 or 1 cupful, stirring occasionally, until the rice is almost al dente (this will take about 15 to 18 minutes).  Don't use all of the liquid--use about 3 1/2 to 4 cups.  Add about 1/2-3/4  tsp of salt and black pepper.

4.  Add the corn kernels and tomatoes.  Add 1/2 cup liquid, stir til absorbed.  At this point, keep tasting the rice.  You don't want it to get mushy.  Keep adding liquid until the rice is the consistency you want it, creamy but "toothy."

5.  Stir in the cheese; taste, and add additional salt if desired. Stir in the herbs, and serve immediately.

Thursday, August 2, 2012

Almost a meal

I am not normally a smoothie kind of person.  At least not as a meal.  I don't feel like I've eaten after I have one, which kind of defeats the purpose.  But smoothies have been on my brain lately, since I have to have my wisdom teeth out in a week, so I thought I'd play around with them.  I like this one.  And I have to say, one thing smoothies have going for them: they sure are easy to make!

I was toying with the idea of turning a smoothie into "food."  What could I add that would make one more substantial?  Then I was thinking about muesli, and how if you soak oatmeal in milk it doesn't have to be cooked because it softens on its own.  The next thought was, "Well, yogurt is milk.  And it feels a little more substantial."  Blueberries were the fruit in the fridge, and voila: a blueberry-oatmeal smoothie.  It's a little sweet from the honey, a little tart from the blueberries and yogurt, and a little nutty from the oatmeal and walnuts.  There's also a texture to it from those last two.

Blueberry-Oatmeal Smoothie
serves 1

3/4 cup Greek yogurt (I used plain)
1 to 2 tbsp oatmeal, uncooked
1/2 cup blueberries, washed, water still clinging a little
1 to 2 tsp honey
1/4 tsp cinnamon
2 tbsp milk
2 tbsp to 1/4 c walnuts
ice cubes (optional)

Add the yogurt and oatmeal to the blender.  Let them sit for a few minutes, so the oatmeal begins to soften.  (You could do this overnight.)  Add the rest of your ingredients and blend until as smooth as you can get it. 

Thursday, July 26, 2012

No Blah Here

This is my new favorite summer salad.  It's almost too pretty to eat.

Hahahahahaha!

As if.

It is really pretty, though, and it couldn't be any easier or more customizable.  The basics:  chop the stems of rainbow chard into 1/4 inch slices, and chop or tear the leaves into bite-sized pieces.  Place the chard stems in the bottom of a colander, put the leaves on top.  Boil a cup (or more) of orzo--I used whole wheat.  When the orzo is done, pour it over the chard.  Drain really well, and then mix in what you want.  This salad has sliced zucchini and radishes, shredded yellow squash, diced tomatoes, and basil.  Add the cheese of your choice (this one has feta), and the dressing of your choice (I'm partial to a red wine vinaigrette), stir, and either eat right away, or chill and serve cold.

Normally, I find pasta salads either overdressed, really boring, or both.  But there's no blah here, and doesn't have to be because you can change up what goes in each time.  Hooray!

Wednesday, July 18, 2012

Twee Tasty Tartlets

We had a surfeit of blueberries this week, and more than any other fruit, except possibly apples, blueberries inspire me to cook with them.  We've had blueberry muffins, blueberry scones, and now, miniature blueberry tarts.


My first thought when I saw the recipe was, "Ugh.  Fussy."  But they weren't.  Here are my tips:

1.  Get yourself a tart tamper.  It will make putting the dough in the mini-muffin tin a heck of a lot easier.  I was singing my sister-in-law's praises for recommending this little beauty.

2.  Don't be tempted to overfill the tart cups.  You'll have blueberry lava flowing and merging all over the tin.  (If, like me, you can't resist, make sure you start smoothing the lava back into each cup shortly after you pull them out of the oven.  Also, start carefully loosening the tarts as soon as you've re-sorted the lava.  And clean the tin as soon as you have the tarts safely on the cooling rack. Once that blueberry stuff cools, it takes a jackhammer to remove.  I've done it both ways, and prefer the non-jackhammer way.)

3.  After you fill the cups, pop them back in the fridge for a while, even though the recipe doesn't call for it.  Especially if it's a 90 degree day, as it is here.  

3.  Make sure your mini-muffin pan is really, really non-stick.  Life will be easier.

4.  If some of the tartlets resist coming out of the pan, eat the evidence.  Heck, there are 24 of them.  Who's going to miss one?  Or, um, two. 


Here's the link.  Enjoy!

http://www.marthastewart.com/275045/blueberry-recipes/@center/276955/seasonal-produce-recipe-guide#/254674

Friday, July 13, 2012

Delicious Experimentation

I know.  It's been awhile.  These nachos were inspiring, though (and my sisters asked what the heck was going on with the blog) so here I am!  But more importantly, here are these nachos.

The town we live in is just south of Boston, Massachusetts.  We have a wealth of restaurants in Boston, of course, but our town is no slouch, either.  You can get great Vietnamese at Pho Hua, great fried seafood at Tony's on the beach, tasty "modern comfort food" at Remick's, and AWESOME nachos at the Fat Cat. 

The nachos in question are Roasted Garlic-Pulled Pork nachos.  In the interest of full disclosure, I will admit that when I'm having an especially bad day, I have been known to eat the entire plate (minus a few naked chips) by myself.  I'm sure it's only about 7,000 calories and 920 grams of fat.  Fortunately, I don't have those kinds of bad days too often...!  Usually, I'm willing, nay, I prefer, to share.

As you can imagine, there's nothing low-fat about these suckers.  But making them at home, it's easier to control that somewhat.  There's nothing fast about these if you don't already have the pulled pork made, but do yourself a favor:  roast a pork shoulder for dinner one night over a weekend, roast some garlic at the tail end of the roasting, and shred and save about 2 cups of the meat so you can make these.  You won't be sorry.

Roasted Garlic and Pulled Pork Nachos
idea taken from the Fat Cat Restaurant

Roasted Pulled Pork and Roasted Garlic
one 4-5 pound bone-in pork shoulder roast, with fat left on
salt and pepper
2 bulbs garlic

Preheat oven to 425.

1.  Score the fat on the pork in a diamond pattern, making sure not to cut into the meat.  Rub about 1 tsp salt into the cuts.  Salt and pepper the other sides, to taste.  (see Jamie Oliver for an amazing recipe for this)
2.  Put the meat fat side up on a rack in a roasting pan (I used a cooling rack inside a jelly-roll pan, because I left my roaster in NY.).  Bake for 30 minutes, or until the fat starts to get crispy (crackling!).
3.  Cover the meat tightly with foil, lower the heat to 325, and roast for 3-5 hours (depending on the size of your roast) or until the meat is shrinking from the bone and pulls apart with two forks.  Remove the foil for the last 1/2 hour so the crackling crisps up again.  If you want to eat it.  If not, don't bother. 
4.  One and a half hours before the pork is done, cut the top off of the garlic bulbs, so that all garlic cloves are showing.  Place each on its own square of heavy-duty foil, drizzle each with about 2 tsp olive oil, wrap tightly, and roast in the oven until soft. 
5.  Remove pork and garlic from oven.  Shred two or so cups of the pork to use for the nachos, and enjoy the rest for dinner!  Or, well, maybe a few dinners... 

Nachos
(serves 4...or in our house, two for dinner)

2 cups shredded pork
1 cup barbecue sauce of your choice, divided  (a balanced sweet-tangy is best here)
roasted garlic, cloves squeeze out of the papery husk (use as many of the cloves as you want--I used a little more than half of a bulb; the restaurant definitely uses more)
1 cup cooked corn  (frozen is fine here)
two to three handfuls of tortilla chips per person
4-6 oz shredded smoked mozzarella or smoked cheddar (or a mix)
pickled jalapenos (optional)
Corn and tomato salsa (see below)
plain Greek yogurt or sour cream for serving (optional)

Preheat oven to 325.

1.  In a medium saucepan, heat the pork, 3/4 cup barbecue sauce, and garlic over low heat until warm.  Add corn, cook until warm.
2.  Scatter the tortilla chips on a jelly roll pan.  Evenly distribute the pork over the chips, drizzle over remaining barbecue sauce, sprinkle with jalapenos (if using) and evenly sprinkle cheese over all.  Bake on middle rack of oven for 20 minutes, or until the cheese is melted and edges of chips are just starting to brown.
3.  Remove the nachos from the oven.  Evenly distribute the corn and tomato salsa, leaving the juices behind, over the nachos.  Return to the oven on the top rack, and bake until the tomatoes start to soften and the chips are browned at the edges, 7-10 minutes.  Serve with yogurt or sour cream, if desired.

Corn and tomato salsa

1 cup cooked corn* (fresh is better here, but frozen-quick cook it and drain it well-is fine)
1 cup chopped tomato
1 tbsp shredded basil
salt, to taste

Mix all ingredients to combine.
*If your corn is fresh, you could pan roast it or grill it to add a slight layer of smoky flavor.


Monday, March 26, 2012

Just a quickie

No photos today, just a recipe I wanted to share (and write down somewhere that I could find it again.)  This chili is vindication for the hours spent "putting by" last summer.  The zucchini, peppers, tomatoes and corn were all from my stash.  Woohoo!

Vegetarian Quinoa Chili
(Vegan, if you skip the cheese and yogurt garnishes)

1/2 cup quinoa, well rinsed and drained
1 cup of water
pinch of salt

1 tbsp canola oil
1 1/2 c chopped onion
2 garlic cloves, minced
2 cups shredded zucchini (I pulled mine out of the freezer; fresh would work great, too.)
1 tsp salt (or to taste--maybe start with 1/2 and build from there)
1/2 tsp ground coriander
1 1/2 tsp cumin
1 1/2 tsp regular chili powder
1/2 tsp Chipotle chili powder  (or another 1/2 tsp regular, instead, if you don't want the heat)
1 cup chopped roasted red pepper
1/2 cup chopped roasted poblano pepper (could use fresh versions of both peppers; if you do, add them with the onion and garlic so they can soften)
1 can kidney beans, rinsed and drained
1 can black beans, rinsed and drained
2 cups tomatoes (mine was puree from summer canning; use what you like, but use the juices, too)
1-1 1/2 cups frozen corn
juice of 1/2 a lemon  (lime would be great too, but I had lemon)

Garnishes:  (all optional)
diced avocado
shredded Pepper Jack cheese
Greek yogurt
fresh lemon juice

1.  In a small saucepan, bring the quinoa, water, and pinch of salt to a boil.  Lower the heat, cover, and simmer for 15-20 minutes, or until water is just absorbed.  Remove from heat.  Leave lid on so quinoa can "steam" until you're ready for it.

2.  In a Dutch oven, bring the oil to medium temperature.  Add the onion and garlic and cook, stirring often, until they begin to soften, about five minutes.  Add the zucchini.  If using frozen, you'll want to cook off most of the water it releases before adding the rest of the ingredients.

3.  Add salt through chili powders, and cook, stirring, for one to two minutes, or until the spices have mixed in well and look a bit like a paste.  Add the peppers, beans, and tomatoes.  Bring to a boil, reduce the heat to a simmer, and cook five minutes.  Add the corn.  Cook just until heated through.

4.  Add the lemon juice and quinoa.  Stir to mix completely.  Taste, and adjust seasonings/spices to your liking.  Top with any desired garnishes.

Sunday, March 25, 2012

Spring Chill

Sometimes, I hate it when I'm right.  Temperatures dropped this weekend; it's not wintry or anything, but it's a challenge after the sheer bliss of earlier in the week.  What to do, what to do?

Make soup.

Make-Way for Spring Minestrone w/ Ricotta-Honey Toasts

serves 4-6

2 tbsp olive oil
1 cup chopped onion
1 large stalk celery, chopped
1/4 cup chopped carrot
1 tbsp minced garlic
salt and pepper to taste
1 cup diced, peeled turnips
1/2-1 cup diced, peeled parsnip (sometimes I find parsnip an overwhelming flavor, so I go light)
2 bay leaves
3-5 sprigs thyme
2 tbsp chopped parsley
4 cups shredded cabbage (I used green)
1-1 1/2 cups peeled carrots, sliced into 1/4 inch coins
4-6 cups chicken or vegetable broth, water, or a mix
1 cup rinsed and drained cannelini beans
1 rind parmigiano reggiano cheese (optional, unless you live here)
1 cup chopped frozen green beans (not thawed)


1.  In a Dutch oven, warm the olive oil over medium-low heat.  Add the onion, celery, 1/4 c chopped carrot, garlic, and a pinch of salt and pepper.  Cook, stirring occasionally, until the vegetables begin to soften.
2.  Add the turnips, parsnips, bay, thyme, and parsley.  Cook about 5 minutes, stirring occasionally. 
3.  Add the cabbage and carrot coins.  Stir to coat with the oil, and add 4 cups of the liquid.  Bring to a boil, reduced the heat, add the cannelini beans and cheese rind, and let simmer 10 minutes.  (Before adding the beans, check the level of liquid; if you'd like it "soupier" add the rest of broth.  I did.) Taste, and add salt and pepper to your liking.
4.  Just before turning off the heat, add the frozen green beans.  Cook for about 2-3 minutes.  Serve immediately, with Ricotta-Honey Toasts.

Ricotta-Honey Toasts
make as many as you want :)

1/2" thick slices of a country-style or Italian bread, lightly toasted
ricotta cheese (1 tbsp per toast slice)
freshly grated black pepper
honey, for drizzling

Spread ricotta on toast slices.  Warm in the oven or toaster oven (I used the "light" toast setting on my toaster oven).  Grind black pepper over the ricotta cheese (I go about medium-heavy with this) and then drizzle honey over top.  Serve warm.

Friday, March 23, 2012

Dinner a Deux

...on the deck.  In March!  For the second time this week!

We actually could have eaten on the deck four out of the five evenings this week, but two of them I was just too tired and cranky to cook.  Standardized testing often does that to teachers (and their students).  But enough of that nonsense, because mostly, this has been a great week.  Temperatures have been at least in the 70's this week, and nights have been in the 50's.  I know it won't last throughout March, or, well, it shouldn't last throughout March, so I've been spending as much time outside as possible.

There are many things popping their adorable heads up all over the garden.  The sorrel is probably a week away from being able to start (sparingly) harvest it, chives are gangbusters, and mint, marjoram, and oregano and their ruffly little selves are appearing everywhere.  Because that's what they do, which is a whole 'nother story.

A few heads of escarole over-wintered, along with some collards and two kinds of kale.  The Blue Vates Kale that I harvested last December by cutting them at the stalk near the soil line are leafing out again.  (Sometimes it pays to be lazy and not pull stalks.)  The greens are all still too small to pick, but they're on their way. 

I've planted peas and fava beans--the favas are new this spring, so I'm keeping my proverbial fingers crossed, because I LOVE fava beans.  If they're a success, I'll be a happy gal.  In the kitchen window, I've started more collards, broccoli rabe, spinach, basil, tomatoes, and ground cherries--they're new this year, too.  I've planted zucchini seeds, but they're still hibernating.  Or, perhaps, I am going to add another year to my seemingly complete inability to grow the little stinkers.  For now, I choose to go with hibernating.

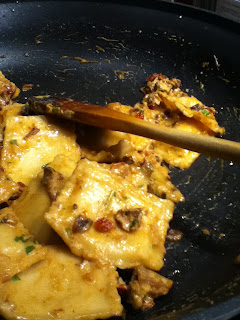
With all this green stuff everywhere, I was craving a spring risotto.  I pulled the last sad leeks from the refrigerator, dug out some frozen peas, snipped some chives and mint, crisped some prosciutto, and yum.

I used to be afraid of risotto, along with yeast breads and pie crusts.  But unlike motorcycles, you can eat these things, so they're fears I wanted to conquer.  I'm still not always brilliant at bread, but I'm really comfortable with the other two these days.  And risotto is worth getting comfortable with, because that creamy deliciousness, achieved without using cream, is wonderful.  A spring risotto, in my head, anyway, is a cross between earthy and green.  The leeks gave me earthy, the peas gave me a cross between the two, and the mint and chives provided the straight-up green.  I added a little lemon zest at the end, and it perked things right up.  Served with some grilled shrimp doused in lemon juice, dinner was the perfect blend of spring's green and its lightness.

Pea, Leek, and Prosciutto Risotto
serves 4

1 tbsp olive oil
2 small leeks, white and light green parts only, sliced into half moons and well-washed
1 cup risotto rice (I used Carnaroli, because it's what I had)
1/4 c dry white wine or dry vermouth
3-4 cups chicken broth, vegetable broth, or even water (I had 3 cups in the fridge, and added 1 c water)
salt and pepper to taste
3/4-1 cup frozen peas, not defrosted
1 tbsp + 2 tsp chopped fresh chives
1 tbsp chopped fresh mint
1/4-1/2 cup grated parmigiano reggiano**
zest of a lemon
crispy prosciutto, optional*

1.  Bring the broth/water to a simmer.  Keep warm.

2.  Heat the olive oil in a medium skillet over medium heat.  Add the leek and a small pinch of salt.  Cook, stirring often, until very soft.  Reduce the heat if browning too quickly.  Stir in the rice, and cook, stirring, until the outer edges of the rice grains begin to look somewhat translucent.  Add the wine or vermouth, and cook, stirring, until most of the liquid is absorbed.

3.  Add one cup of the warm liquid to the rice.  Cook, stirring occasionally, until most of the liquid is absorbed, but the pan still looks a little "creamy."  Add another cup of the liquid, and repeat.  At this point, I begin adding the liquid in half-cup increments; tonight's risotto used just over 3 cups of the liquid to reach the creamy-but-with-a-hint-of-a-bite I like in my risotto.  This whole process should take less than 20 minutes.  Have a tasting spoon so you can start checking for done-ness after your third cup of liquid.  As the risotto begins approaching your preferred consistency, add the peas and 1 tbsp of chives, and stir through.

4.  When the risotto consistency is where you like it, turn off the heat and stir in the 2 tsp chives, the mint, the cheese, and the lemon zest.  Crumble over the crispy prosciutto, if using.  Taste and adjust for salt and pepper, and serve immediately.


Crispy Prosciutto
3 slices prosciutto
Heat your oven or toaster oven to 350.  Make a "nest" or mound of each piece of prosciutto on a baking sheet, and bake until crispy, anywhere from 7-15 minutes.  Keep an eye on it, as it can go quickly as it gets near its state of perfect crispness.

*Leave off the prosciutto and use vegetable broth, and the risotto is vegetarian.
**Also leave out the parmigiano reggiano to delight the vegans in your life.

Monday, March 12, 2012

It's not an insult


In this house, the word "tart" is thrown around lovingly.  I'm not sure when I became so enamored of these glorious concoctions, but I can't get enough of them.  Sweet and savory, breakfast, lunch, and dinner, tarts are in the rotation. 

This weekend, I made three: a roasted red pepper and prosciutto tart from a Fine Cooking magazine issue a few years back, an Artichoke Polenta Tart from Maria Speck's book, Ancient Grains for Modern Meals, and a Rocky Road Tart from Martha Stewart.


I was grumbling to Larry on Saturday about how time consuming the red pepper tart is, but after having it for lunch today, I'm kicking those grumbles to the curb; this tart is worth every second!

If you're interested in the roasted red pepper tart, you can find the recipe posted here, http://userealbutter.com/2009/05/04/roasted-pepper-goat-cheese-tart-recipe/ or at Fine Cooking's site.  You'll need a membership to read it at the magazine site, though.

Here's the Martha Stewart recipe:
http://www.marthastewart.com/314986/rocky-road-tart

I'll get back to you on the Artichoke and Polenta Tart--we loved it, but I want to make it and actually follow the recipe before I say anything else. My main concern: I didn't have the correctly sized tart pan, which I think made a difference. 

Oh darn.  I'll have to go shopping.  And make the tart again.  Poor me.

Wednesday, March 7, 2012

Are those angels singing?

Oh.  No, sorry.  It's just the flowers coming up in the garden.
Don't worry.  The hyperbole only lasts until I've been warm for a while.
(Waiting for food?  Scroll on down!)


Hello, little leaflings.  Welcome to spring. 
We'll be eating sorrel again soon!  Very excited, since I have a new sorrel tart I want to try.
But tonight, I tried a quinoa and beet recipe from Maria Speck's book, Ancient Grains for Modern Meals.  I'm in love with this book.  I'm intrigued by whole grains and the variety of things we can do with them, and Speck's book runs the gamut, from starters to sides and mains to desserts.  This is healthy food, but it's not Health Food.  Speck isn't afraid of heavy cream or butter, and some of the meals look luscious.  I'm pretty sure I'll be posting more as I try her recipes.
I served the quinoa and beets with a spinach and bacon salad (without the bacon, I think Larry might have rebelled some) and enjoyed dinner very much!  The beet I had was on the small side, so I amped up the crunch in the salad with a carrot.  The black flecks you see are cumin, and I used sumac for the first time.  Simmering away on the stove, the smell was divine; earthy, nutty and warm.  The finished recipe was the same, with a sweet freshness from the beet and carrot, and a lemony tartness from the sumac and lemon juice.

The recipe calls for a garlic-yogurt sauce, which I also made.  I liked the quinoa with and without the yogurt, but Larry definitely preferred it with the yogurt stirred through.  We had it as our main dish, but it would make a great side dish; it's also good warm, room-temp, and cool.

Cumin-Scented Quinoa with Beets
from Ancient Grains for Modern Meals by Maria Speck

Quinoa
1 tbsp extra virgin olive oil
1 tsp whole cumin seeds
1 cup quinoa, (yellow if using yellow beets, red for red beets) well rinsed and drained
1 3/4 cups water
3/4 tsp fine sea salt
1/2 tsp sumac

Sumac and Yogurt Topping, and to Finish
1 cup plain yogurt
1 clove garlic, very finely minced
1/2 tsp sumac or 1 tsp fresh lemon juice
1 1/4 cups peeled, shredded raw beet (I also added a carrot)
1 to 2 tbsp fresh lemon juice
1 or 2 pinches cayenne pepper

1.  Heat the olive oil in a medium saucepan over medium heat until the oil shimmers.  Add the cumin seeds and cook, stirring, until the seeds darken and become fragrant, about 30 seconds.  Stir in the quinoa (Speck warns it may splatter, and she is correct) and cook, stirring, until hot to the touch, about one minute.  Add the water, salt, sumac and bring to a boil.  Decrease the temperature to maintain a simmer, cover, and cook until the liquid is absorbed, about 15-20 minutes.

2.  Make the sumac-yogurt topping.  Beat the yogurt and garlic in a small bowl with a fork until smooth.  Sprinkle with sumac and set aside (I mixed the sumac in).

3.  To finish, remove the saucepan from the heat.  Stir in the shredded beet, cover, and steam for 3 to 5 minutes.  Stir in 1 tbsp lemon juice and the cayenne.  Taste for seasoning, and serve with the yogurt topping.

Tuesday, March 6, 2012

A little giddy

It's supposed to be 60* tomorrow and Thursday.  And sunny.  And the tulips, daffodils, and sorrel are coming up, and the hellebores are blooming.  Spring is returning to us again.


Buuuuut...today is still in the 40's.  Warm, comforting stews are still a safe and tasty bet.  I'm working on leftovers and freezer and pantry supplies again, trying to whittle them down before all the fresh stuff starts coming in for our Spring Treat Share.  Today's challenge:  sprouting potatoes from the pantry, and leftover leg of lamb and chopped kale, both pulled from the freezer.  I've been wanting lentils lately (I don't think my 15 year old self would recognize me...) so I combined the lamb and kale with a recipe from The Complete Italian Vegetarian Cookbook, by Jack Bishop.  I tell you, if I had to give up meat, this is the book I'd cook my way through first.  My mouth waters more every time I turn a page.


The recipe is "Spicy Lentils with Tomatoes and Aromatic Vegetables."  I'll give you the basic recipe, and weave in my additions and suggestions so you can play to your heart's content.  The recipe as it stands is earthy and warm, with a little fresh zing from the parsley (or recommended basil-if-you-have-it).  The lentils have just enough bite to feel like you're chewing something, and the tomatoes add their acidic sweetness.  It really didn't need anything I added to it.

But it was good with all that stuff, too.

Spicy Lentils with Tomatoes and Aromatic Vegetables
from The Complete Italian Vegetarian Cookbook by Jack Bishop, with additions by me

2 tbsp extra-virgin olive oil
1 medium onion, minced (I didn't go crazy with the mincing--just tried to make the vegetables a little larger than the lentils)
1 medium carrot, peeled and minced
1 celery rib, minced
2 medium cloves of garlic, minced
1 1/2 cups drained canned whole tomatoes, chopped (I used my homemade canned tomato sauce, 2 cups)
1 1/2 cups brown lentils (I lowered this to 1 cup)
pinch of cayenne (I used about a 1/2 tsp Aleppo pepper, but might add  both next time--we like the heat)
2 tbsp chopped fresh parsley leaves (or basil, or both)
salt, to taste

My additions:
2 cups potatoes, peeled and diced small
2 cups chopped, cooked kale
2 cups chopped, cooked leg of lamb
juice of half a lemon

1.  Heat the oil in a large saucepan.  Add the onion, carrot, and celery and saute over medium heat until softened, about ten minutes.  Stir in the garlic and cook for one minute more, or until slightly softened.  (If using the potatoes, add them with the garlic and cook an additional 3-5 minutes, just to get them going.)

2.  Add the tomatoes, lentils, cayenne, kale, if using, and 4 cups of water (I started with three, since I had the juicy tomatoes, but wound up adding almost the full other cup to keep the dish a little brothy as it simmered).  Bring to a boil, reduce the heat to low, and simmer gently, stirring occasionally.  If using the lamb, add it in after the pan has reduced to the simmer.  (I put a lid on it at this point, though the recipe doesn't call for it.)  Cook until the lentils are tender and the liquid in the pan is almost evaporated, about 30 minutes.

3.  Stir in the herb(s) and salt to taste, and stir in the lemon juice.  Serve immediately.

We had to laugh--the dish was to help clean out the pantry/freezer.  But this made enough to feed 5-6 people, so a serving went back into the freezer after we portioned out our lunches.  Oh well, I can't be sad about having food stored away!

Wednesday, February 29, 2012

Mushroom and Fig Pasta Sauce

There's no photo for this one.  Hopefully you can picture it's tawny-leading-to-slightly rosy hue, studded with mushrooms and swirled around pasta.  If you can't, no worries.  It isn't the most photogenic recipe in the world, anyway, especially when dealing with my photography, which doesn't do much to elevate the mundane.

There is not, however, anything mundane about this recipe.  I've been making it for a few years now, and it was originally a riff on a Giada recipe that used chicken.  I have no idea where that original recipe is, but it doesn't really matter, because we love this one

"It" is a mushroom-y, figgy, mascarpone-y pasta sauce that is just right when you need a big bowl of comfort.  The sauce is rich and creamy, and just a tad bit sweet and a smidge tangy, with an assortment of mushrooms to add bite.  The add-ins are up to you.  Even better, if you don't like the prepared fig sauce that I use for ours, you can find one that you do like, or you can make your own fig "jam" from dried figs that you rehydrate and spin in a food processor until it's sticky and pasty.  Mix that with a complementary liquid, and you're good to go. 

Mushroom-Mascarpone Fig Sauce
strand pasta, cooked and reserved, with 1/2 cup cooking water also reserved (angel hair would probably be too delicate here, but anything else is a go)
olive oil
1 small onion, halved and cut into thin half moons
2 cloves garlic, minced
1 lb assorted fresh mushrooms, sliced (I like a mix of button, cremini, and trumpet for the different textures they bring)
1/4 cup white wine or vermouth
1/2 cup Stonewall Kitchen's Vidalia Onion Fig Sauce
4 oz mascarpone cheese
1 heaping tsp Dijon mustard
salt and pepper to taste
2 tbsp chopped fresh parsley

Optional (all, some, or none!): sauteed chicken breast, cut into bite sized pieces; 1/4 c dried figs, chopped; 1/4 c grated parmigiano for sprinkling on top

1.  In a large skillet, heat the olive oil over medium.  When shimmering, add the onion.  Cook until softened and starting to turn golden, stirring frequently, about 5-7 minutes.  Add garlic, cook, stirring, for two minutes.

2.  Add the mushrooms, and maybe some more olive oil if the pan looks too dry.  Stir the mushrooms in with the garlic and onion, and then spread in the pan into as uniform a layer as you can.  You want to get some browning on the mushrooms.  (There won't be much, since your pan will be pretty full and mostly steaming, but if you're patient and leave them be for a few minutes, you'll get some brown spots.)  Leave for about 3-5 minutes, and when some of the bottom layer have browned somewhat, stir.  Make a well in the center of the mushrooms, and add the wine.  Cook, stirring occasionally, until most of the liquid evaporates.

3.  Make another well in the mushrooms, and add the fig sauce, mascarpone, and dijon mustard. (Add the dried figs now, if using.) Stir them together, trying not to pull in too many of the mushrooms until you have an almost uniform sauce forming.  Once the three have started to blend, mix the mushrooms into the sauce.  (This isn't 100% necessary, but I've found the sauce comes together better this way.)  Taste, and add salt and pepper to your liking.  Stir in the parsley, and then add the pasta.  Toss.

4.  If the pasta seems a little dry, add the reserved pasta water, a tablespoon at a time, until desired consistency.  If using, add in chicken and stir til warmed through.  Sprinkle with parmigiano, and mangia!

Friday, February 24, 2012

It's a beautiful day...

for painting.


Painting isn't my first choice, but I haven't figured out how to animate our paintbrushes a la The Sorcerer's Apprentice yet, so I'll just have to do it myself. 


Besides, the kitchen will look a lot better when this area looks a little less...industrial. 

But first, sustenance.  The larder looked pretty grim this morning, but with four ingredients, we pulled off a respectable breakfast.  Corn tortillas, salsa, eggs, and cheese.  Breakfast of champions.

Open-faced Breakfast Tortilla


2 corn tortillas
1/4-1/2 cup of your favorite salsa

1 tbsp butter
2 eggs
1/4 cup of shredded cheese (we used cheddar, but parmigiano, Monterrey Jack, Colby, etc. would be good)

1.  Preheat oven to 350.  Line a sheet pan with parchment paper.  Lay the tortillas side-by-side on the parchment.  Cover each with half of the salsa, smoothing it out not quite to the edges.
2.  Heat a small nonstick skillet over medium-low heat.  Melt butter and swirl to coat pan.  Crack eggs into skillet and cook to your specifications--scrambled, over-easy, etc.  However you cook them, slightly undercook them since they'll go a little longer in the oven.  Slide the eggs (or portion them out, if scrambled) onto the tortillas. 
3.  Divide the cheese evenly over each tortilla, and bake for 5-8 minutes, until cheese is melted and the tortilla edges are a little crispy.

Sunday, February 19, 2012

Only six months...

until I can have another homegrown tomato.

You should be very impressed that I didn't burst into tears as I typed that.  I certainly thought about it.

Larry and I went out to a great restaurant last night, The Fireplace, in Brookline.  They cook seasonally, so roasted root vegetables, hearty braises, and cheesy soups and polentas are all over the menu right now.  Dinner was wonderful.  But it was missing a certain something...


I'm embracing the season.  Really.  In fact, winter has been quite loveable this year, treating us gently and to a lot of sunshine.  I've found a new chili/stew that I adore--Butternut Squash, Black Bean, and Beef, and I've braised up a storm.

But I can't grow tomatoes.  And I really, really want to be growing tomatoes.

I take some comfort in the fact that I'll be starting seeds indoors soon, and for the first time I'm going to attempt tomatoes from seed.  I'm also hedging my bets, and I bought some seedlings (I'm no fool).  It will be good to have my hands in the dirt, and have plants to fuss over, unlike the sturdy houseplants we have that need no fuss.

But, heavens.  I'm still six months away from a homegrown tomato!

I think I'll go drown my sorrows in jar of the straight-up sauce I put by last summer, and continue to muddle through somehow.

Wednesday, February 15, 2012

30 Minute Meals. Psssh...try 10.

I must confess.  I cheated.  I had dinner at Panera tonight.  I wasn't going to, really.  But then my friend got a salad, and it was fresh--not previously frozen--green things.  And, well, I caved.  Who knew lettuce could be so wonderful.

BUT!

This must count for something.  Larry was home waiting for dinner, so when I got home, I made the from-the-pantry meal I had been planning.  I just didn't eat it with him.  Though, dear reader, I did contemplate--briefly--lying and saying I hadn't eaten, so I could boast about my eating-at-home streak.  But summer will come, and I won't want to wear a parka in July, so I didn't.  Also, because there are limits to even my insanity.

Dinner was Pasta with White Beans, Kale, Artichokes and Tomato Sauce.  And because it was mostly from the freezer, it was ready in about ten minutes.  Not too shabby.  The nice thing about tomato sauce is that if you add things like fresh garlic and onions, it doesn't taste like it came from a freezer or pantry. This was a little briny from the artichoke hearts, chewy from the kale and pasta, and creamy from the beans and tomatoes.  And these ingredients, especially the beans, tomatoes, and kale, are made for each other.  Add a sprinkling of Pecorino-Romano cheese, and it's a filling dinner for a cool winter night.

White Bean, Kale, Artichoke Tomato Sauce

2 tbsp olive oil
1/2 onion, chopped
1/2 tsp red pepper flakes
1 garlic clove, minced
1 cup chopped kale (mine was previously frozen and defrosted; if you're using fresh, this is probably half of a bunch)
1 1/2 tbsp tomato paste
2 cups crushed (or whatever--diced, sauce, etc.) tomatoes
1 can (or defrosted equivalent) of cannellini or other white beans
3 artichoke hearts, from a 15 oz can, drained and chopped
salt and pepper to taste

1.  Heat olive oil in a large skillet over medium heat.  Add onion, red pepper flakes, and stir, about two minutes, until onion begins to soften.  Add garlic, stir, one minute.
2.  Add kale to skillet, sprinkle with salt, and cook, stirring occasionally, for about three minutes (if previously frozen; if fresh, make it about six-seven). 
3.  Add tomato paste and stir through.  Add tomato sauce, beans, and artichoke hearts.  Bring to a low boil, reduce heat, and cook until sauce is thickened to your liking, 5-7 minutes.  Add salt and pepper to taste.  Serve over pasta.

Saturday, February 11, 2012

What the day has wrought

Today, unless I was cooking, I was parked on the couch.  Some days we just need that.  I'll just have to remember to flip the cushion that I spent so much time on...I'd hate for my lack of activity to be so immediately obvious!


I was able to get ahead on the week in between couch visits by roasting turnips, butternut squash, celeriac, potatoes, and carrots, and boiling beets.  (Roasting is good couch-potato cooking.) I used some in tonight's brisket, (Ditto the brisket.) but the rest will be quick sides or ingredients for dinners. 

The brisket, a Tyler Florence recipe, was wonderful.  Perfect gray-day food.  And it's hard not to love something that fills the kitchen with the smell of rosemary and garlic.  Here's the link:
http://www.foodnetwork.com/recipes/tyler-florence/beef-brisket-recipe/index.html
Those fancy-schmancy steak houses can keep their filets and t-bones.  Give me meat that's falling apart anytime!  Sometimes slow-cooking a tougher cut of meat can leave the meat dry, even though it's braising in a liquid, but this brisket was moist and crazy-tender.  There are two cups of  red wine in the recipe, and two cups of tomatoes, but everything simmers for so long that the flavors are round, beefy, and juicy.
I served it with a Maple-Pecan Oat Muffin from one of my favorite cookbooks, Maple Syrup Cookbook: Over 100 Recipes for Breakfast, Lunch, and Dinner by Ken Haedrich.  (I actually made them for breakfast tomorrow, but they smelled so good...and there are were twelve of them, so we still have some for breakfast.)  I highly recommend this cookbook, particularly if you like maple syrup as much as Larry and I do, but even if you only like it a little, these recipes are brilliant.

We ate the muffins warm, and they were densely fluffy, if that makes any sense.  I suspect that cold they'd be a little less appealing, but that's why the universe contains toaster ovens.  The maple syrup is a background note, though the muffins smell really maple-y.  I tried doing what I sometimes do with wine--taking a bite and breathing in the aroma at the same time--but, well, let's just say that's not a great idea with things that crumble...come to think of it, it doesn't always turn out so well with the wine either...

Aren't you sorry you don't have me around for when there's nothing on television?

The original muffins called for walnuts, but I LOVE pecans and maple together, so I swapped.  They come together in no time flat (as long as you have all the stuff...and we've already discussed the state of my pantry...)

Maple-Walnut (or Pecan) Oat Muffins
recipe by Ken Haedrich

1 1/4 cups old-fashioned oats
1 cup whole-wheat flour
1/2 cup unbleached or all-purpose flour
1 tsp baking powder
1 tsp baking soda
1 tsp salt (I went a little shy on this)
2 eggs
1 cup buttermilk
1/2 cup pure maple syrup (it doesn't specify, but I used grade B)
1/4 cup vegetable oil
1/2 cup finely chopped walnuts or pecans

1.  Preheat oven to 400 F.  Grease a 12 cup muffin tin and set aside.

2.  Process the oats in a food processor or blender until they are reduced to a coarse powder; it's okay if some larger flakes remain.  Measure exactly one cup of this oat flour and combine it in a large bowl with the other flours, baking powder and soda, and salt.  Whisk together.

3.  Beat the eggs in a medium bowl, and add in buttermilk, maple syrup, and oil.  Make a well in the dry ingredients and pour in the wet.  Stir just until combined.  Fold in nuts.  Divide among muffin cups.

4.  Bake for 20 minutes (mine took 16), or until golden.  Serve hot or warm.

More pantry cooking


Pretty purple gazing ball not-withstanding, today is kind of gray.  It has been snowing since we woke up, but it's too warm for any to really stick as of yet.  Days like this call for a warming breakfast.  I poked around in pantry and fridge, and voila!

This morning's coup?  Chorizo, Zucchini, Cheddar, and Onion Waffles.  It's almost four hours after breakfast, and the house still smells amazing.  This is a waffle recipe I use over and over, from Rachael Ray.  The original is a Grilled Cheese and Chicken Sausage Waffle, but I hate crossing the same territory twice when experimentation is possible, so the variations have been endless: Canadian bacon, regular bacon, different cheeses, sometimes corn and jalapenos, sometimes chives...you get the picture.  As long as you stick to the measurements called for in the original recipe you should be in good shape.  And your house will smell heavenly regardless of the version you attempt.  Here's the link if you're interested:

http://www.rachaelraymag.com/recipes/rachael-ray-magazine-recipe-search/budget-recipes/grilled-cheese-and-chicken-sausage-waffles


Friday, February 10, 2012

The On-Hand Challenge


If television producers were to come look in my pantry and freezer, I feel fairly certain that I would qualify for "Hoarders".  I'm not sure where the fear of running out of things comes from, but if I get down to two cans of salmon, I feel like I have to stock up.  This could make a lot of sense.

If I actually ate canned salmon more than once every month or so.

It's not that I don't like canned salmon.  I love it, or else why panic that I'll run out, right?  The problem is that canned salmon is not the only thing I'm stocked up on, and so it only winds up in the rotation occasionally.  And when fresh vegetables are in season, the canned salmon is not as appealing.  Sorry, Mr. Fish.  You'll lose to a fresh tomato and basil sauce any day.

But the other day, when I was sliding out one of the pantry doors to check on pasta levels, the sliding drawer collapsed out of its track.  I believe it might have been trying to send me a message.  Since the subtlety of the cans falling over and barely fitting wasn't working, perhaps?

This week, I set myself the challenge of not having to shop for any ingredients except maybe dairy.  (It doesn't freeze or keep as well, so I cut myself some slack there.)  So far, so good.  Monday we were on the road, so we ate out.  Tuesday, we had a fruited quinoa salad stuffed into acorn squash halves; Wednesday we had tacos made with ground beef, frozen spinach, and one of the dwindling supply of butternut squash; Thursday we had the eggplant, etc. panini, and tonight we had the bulgur and chickpea salad you see above.  The only thing I bought was goat cheese to go in the quinoa salad. 

It worked so well (and my pantry drawers are still so full) I'm going to try again for next week.  On deck:  beef brisket, pasta putanesca, pasta with beans and tomatoes, and, yup, salmon cakes.  The brisket is just under three pounds, so it will serve us twice for dinner and twice for lunch, with some probably left over to add to a soup.

The benefit to a stocked pantry and freezer?  Dinner comes together really easily.  As long as you're not reconstructing the pantry shelves every time you pull them out.

Bulgur, Chickpea, and Shrimp Salad
(inspired by something I've read, I'm sure, but mostly by what was on hand)
serves two, with leftover salad (but not shrimp)

1/2 c bulgur wheat
1 1/2 c. boiling water
1/3 c sliced sun-dried tomatoes (if not packed in oil, rehydrate for ten minutes in boiling water--I used dry-packed because I love how they stay so chewy)
 1- 15 oz. can of chickpeas, rinsed and drained
1-15 oz. can of artichoke hearts (use as many as you like; I used three), hearts cut into eighths
1 small shallot, very thinly sliced and separated into rings
grated rind of one lemon 2 oz feta cheese, crumbled
fresh herbs, chopped--I had a tiny bit of parsley left, so I used that, but mint and/or basil would be great
1/4 c fresh lemon juice
1/3-1/2 c olive oil
salt and pepper to taste
pinch of dried oregano
8- 16/20 size shrimp, shells on but deveined  (mine were frozen and defrosted overnight in the fridge, but if you're not having your own personal pantry challenge, feel free to use fresh!)
1 tbsp olive oil

Preheat oven to 350.
1.  Bring the 1 1/2 cups water to a boil,  place bulgur in a glass bowl, pour boiling water over.  Cover with a towel and let sit while you get everything else ready, at least 20 minutes.  Do the same with the sun-dried tomatoes if they're not oil-packed.
2.  Toss together the chickpeas, artichoke hearts, shallot, and lemon rind in a large bowl.
3.  In a small bowl or glass jar with a lid, add the lemon juice, salt and pepper to taste, oregano, and olive oil.  Mix until emulsified.
4.  Toss the shrimp with the olive oil and some salt and pepper.  Lay flat on a baking sheet, and roast for about 15 minutes, or until done to your liking. Start checking at 10 minutes.  Cool slightly, and peel.
5.  If the bulgur hasn't absorbed all the water, drain well.  Add to the chickpea mixture, along with the lemon dressing and any fresh herbs.  Toss well.  Add the feta, and toss gently.  Taste for salt and pepper.
6.  Serve the salad with four shrimp on each plate.

Thursday, February 9, 2012

What do you mean, I've got too much time on my hands?


Eggplant and roasted red peppers.  It isn't summer, but at dinner I might be able to close my eyes and pretend.  These are being turned into panini, with thin slices of leftover meatballs and some mozzarella cheese.  I love my freezer.

Saturday, January 21, 2012

Snow? Who cares?

We got about three or four inches of snow here today,  but since it's the weekend I don't really mind.  It's lovely to sit around in my pajamas all day and watch the white stuff fall.  We have a fireplace insert that works like a wood stove would, and it's been 74* in our living room all day, without the heat kicking on.  Almost balmy.

I made brownies mid-day because I've been jonesing for something really chocolatey.  I have to say, Martha Stewart came up spades.  I spiked the recipe with about 1/4 tsp each of cinnamon and cayenne pepper, and added chopped walnuts, and these may be my new go-to brownies.  They're really easy to make and it seems to me they'd be endlessly adaptable.  If you'd like to give them a whirl, here's the link:  http://www.marthastewart.com/335652/double-chocolate-brownies .

Though my husband would probably disagree, one cannot live on brownies alone (even when they're this good).  We had some locally made mushroom and cheese stuffed ravioli, so I decided to see what kind of "pantry sauce" I could make.  I was hoping I had fresh mushrooms, but nope.  I do have dried porcinis, though, so I started there.  I'm pretty pleased with the outcome; the only tweak I'll try next time is a small shot of fresh lemon juice at the end to brighten the flavors.

Dried Porcini and Sun-dried Tomato Cream Sauce for Pasta
by Me

1/4-1/2 cup dried porcinis, reconstituted in 1 cup boiling water (save the water)and roughly chopped
3 halves sundried tomatoes, reconstituted in 1/4 cup boiling water (save the water) and chopped small, but not fine
2 tbsp olive oil
1/2 shallot, finely chopped (about 1/4-1/3 of a cup)
1 small garlic clove, minced
salt and pepper to taste
1/2 tsp dried rosemary, or 1 tsp fresh, chopped fine
2 tbsp vermouth or dry white wine
1/4-1/3 reduced fat cream cheese  (could use mascarpone, but taste will be a little different)
1 tbsp chopped fresh parsley
squeeze of lemon juice (optional--haven't tried it but think it would be good--if you try it, let me know what you think)

1.  In a medium skillet over medium heat, warm the olive oil.  Add the shallots and garlic, a small pinch of salt, and cook, stirring frequently, until the alliums are softened.  Add the rosemary, and cook, stirring, one minute.  Add the chopped porcinis and tomatoes, and cook, stirring, about two minutes.

2.  Add vermouth to skillet, cook until almost completely evaporated.  Add the sundried tomato water and the porcini water (careful not to pour to the end, since there will be grit in the bottom of the bowl).  Increase heat to medium high and bring to a bubble.  Add salt and pepper to taste.  Reduce heat to low and cook, stirring occasionally, for five minutes.

3.  Stir in cream cheese until melted and smooth.  If using, add lemon juice.  Add chopped parsley, taste for seasoning, and if the sauce seems a little tight, add some pasta water, a small splash at a time, until the sauce is the consistency you want.  Serve over pasta.  Or chicken, or pork chops.